Showing posts with label Paper Smooches. Show all posts

Wednesday, October 8, 2014

DT Day: Vera

Hi all. Vera here. Today I want to share this fun card I made using some Paper Smooches sets.


I rarely play with kraft paper, but when I was crafting with a dear friend a few weeks back, I watched her creating beautiful card using kraft cardstock. So, I decided that I need to gift kraft cardstock a chance. 

And, I sure am glad I did. To create this card, I use Paper Smooches Blossoming Buds, Birthday Sampler and Streamers set. Heat embossed the image and then colored the inside with pencil colors. And for the sentiment, that gorgeous color is from Avery Elle Raspberry ink pad. Seriously, this is one of the best ink pads out there. 

By the way, have you checked out all the new items in the store? We just added Wplus9 and Waffler Flower new releases there. Check it out will you. Thanks so much for stopping by here.

Make sure you check in on our Facebook page, too!  We share news, updates, inspiration, and the occasional giveaway!

Pin It

Monday, September 15, 2014

DT Day: Lindsay

Hi everyone! 
Lindsay with you today, to share a fall card with you.  It's just now cooling off here in Northeastern Ohio, after a few days of hot and humid weather.  That had me thinking about fall, and the cool, crisp air it brings.  I love when the leaves turn, and their color is everywhere!  In that frame of mind, I created this, using fun products from mostly Paper Smooches, and a Lawn Fawn stamp set.  

I started by die cutting the fun Large Leaves Dies, and inking them with Distress Inks.  I set those aside as I worked on my card base.  Taking the Interlocking Backgrounds set from Lawn Fawn, I gold heat embossed the funky chevron strip onto the front of a white note card.  I then die cut the words "you" and "are" from the Kudos Word Die set, using black cardstock, and adhered them to the card, adding the "too kind" from Chit Chat last.
Lastly, I adhered my leaves in a haphazard way, covered them with Wink of Stella glitter, and added glossy accents to my die cut words. I hope you were inspired to break out the die cuts, and inks, and try something fun on your latest projects.  Thanks so much for stopping by!
Make sure you check in on our Facebook page, too!  We share news, updates, inspiration, and the occasional giveaway!

Pin It

Friday, August 15, 2014

DT Day: Sheri

Hello IHP fans!  It's Sheri here.  For today's card I pulled out some goodies from one of my many recent IHP hauls...couldn't resist that BIG Summer Move Sale!  How about you??

Embossing paste seems to be a very hot trend right now and I LOVE how it adds texture to your projects.  I created a fun "Celebrate" card with some Translucent Embossing paste by Dreamweaver along with the Tim Holtz's Stars Layered Stencil.  It was super easy and I love the fun glossy effect I got on the black card stock.  I then stamped a sentiment from Paper Smooches Buzz words set along with the some of the stars to keep the fun theme throughout the card.  I added some clear Wink of Stella and Glossy accents to the stars to make them sparkle and for some added dimension


Supplies:
Paper:Neenah Classic Crest Solar White CS, True Black CS (Papertrey Ink),  Aqua Mist CS (Papertrey Ink); Stamps: Bold Buzzwords (Paper Smooches); Ink: Tuxedo Black (Memento); Tools: Nautical Embossing Folder Set (Lifestyle Crafts - Quickutz), Stars Layered Stencil (Ranger/Tim Holtz), Score-Buddy; Other: Ribbon, Clear Wink of Stella Brush Glitter Marker (Zig), Glossy Accents (Ranger), Embossing Paste Translucent (Dreamweaver),  ATG Tape, Foam Tape
   
Embossing Paste - TranslucentStars Layered Stencil 
 Bold Buzzwords


Thanks so much for stopping By!  Have a wonderful day! 

Make sure you check in on our Facebook page, too!  We share news, updates, inspiration, and the occasional giveaway!

Pin It

Thursday, August 14, 2014

DT Day: Lindsay

Hello, hello i {heart} papers fans! It is Lindsay here with you today, to share a clean and simple card using a couple of fun new Paper Smooches dies.  Hopefully you've already gotten a set or two for yourself, they go fast!
To begin on my card, I took a white card base, and impressed the dashed line, from the Dots & Dashes die set, onto the bottom front.  I then die cut multiples of the rounded bandage from the Band Aids die set out of white cardstock, covering it with Soft Vanilla ink from Hero Arts.


After stamping my sentiment from the Chit Chat set, I adhered the bandages haphazardly all over the front.  I then die cut them again out of red cardstock, and adhered the hearts to the centers of the band aids.  I then covered the hearts with a bit of shimmer, using the clear Wink of Stella glitter brush pen. Thank you for joining me today!  I hope you found a bit of inspiration to use some of those fun dies that I know we all hoard, er, have. Have a great day!
Make sure you check in on our Facebook page, too!  We share news, updates, inspiration, and the occasional giveaway!

Pin It

Wednesday, August 13, 2014

DT Day: Vera

Hi everyone. Vera here today. Am normally, not one to take classes, but with my mojo been on a slump, I decided to take  Online Card Classes Stretch Your Stamps 2. And, boy, this is just what I needed to get my creativity going.

I created this card using one of the technique I learned from the class.


This card is so much fun to make and totally brings back my love of using watercoloring. I used the gorgeous flower cluster from Paper Smooches Blossoming Buds and the sentiment is combination from Avery Elle Oh Yeah and To The Point set. Finished it off with a couple enamel dots from Doodlebugs Bumblebee Sprinklers pack.

That's all from me today. Hope you enjoy today's card. Thank you so much for swinging by here.

Make sure you check in on our Facebook page, too!  We share news, updates, inspiration, and the occasional giveaway!

Pin It

Monday, August 4, 2014

DT Day: Sarah

Hi IHP fans! Sarah here today with a retro feeling card using some Basic Grey paper and fun Paper Smooches stamps. 


Brown and orange just screams 70's to me! I've used the Paws for a Cause stamp set (near and dear to IHP hearts!) stamping with Memento Luxe inks in Espresso Truffle and Morocco. The paper is Basic Grey Herbs and Honey. 

The focal layer is cut from vellum using the Stitched Journalling Card from Lawn Fawn. The flag comes from the same set. I've kept with the earthy feel, accenting with wood dots.


Thanks for stopping by! 

Make sure you check in on our Facebook page, too!  We share news, updates, inspiration, and the occasional giveaway!

Pin It

Tuesday, July 15, 2014

DT Day: Sheri

Hello IHP fans!  It's Sheri here.   It seems that all my friends are having babies so I thought I would create a baby card with some of the papers from the super sweet Baby Mine 6x6 pad from Carta Bella.  I just love the colors and adorable small patterns...they are perfect for baby cards.  The sentiment is from the Salutations stamp set from Paper Smooches.

Have you noticed that a new trend is a curved edge?  Well I don't have a curved border die but I do have Lawn Fawn's Speech Bubble Border die and it worked perfect.  I just cut my papers down to the card size (4 3/4" x 5") and positioned the die with removable tape and ran it through my die cut machine.  It was simple as that.  To give it a little dimension I added foam tape to each curved layer.


Supplies:
Paper: Neenah Classic Crest Solar White CS, Baby Mine 6x6 Pad (Carta Bella); Stamps: Salutations (Paper Smooches); Ink: Certainly Celery (SU!); Tools: Speech Bubble Border (Lawn Fawn), Score-Buddy; Other: Ribbon, White Enamel Dots (My Minds Eye), ATG Tape, Foam Tape

Hope you enjoyed seeing another use for a die that you may have in your stash or on your wish list!!

Speech Bubble Border dies (lawn cuts) 

Thanks so much for stopping By!  Have a wonderful day! 
Make sure you check in on our Facebook page, too!  We share news, updates, inspiration, and the occasional giveaway!

Pin It

Monday, July 14, 2014

DT Day: Lindsay

Today is DT Day with Lindsay but first a heartfelt thanks for the great response to our moving sale.  You guys ordered and ordered!  We were packing orders until the wee hours on Friday and then were able to pack all the remaining inventory on Saturday into only 5 5 big boxes!  WOOHOO!!  So, thank you!

We will be restocking with all new inventory for August so while things may be a little slow on the store front, the DT will still be posting here and to Facebook so check it out.  And make sure you follow our Facebook page because as soon as we're up and running, it will be announced!  And maybe some pictures too!

Now, for Lindsay's post!

Hello i {heart} papers fans!

Lindsay here with you today, to share a fun rainbow card using the Just A Note set from Paper Smooches.  I think this set might not be available in the store anymore, but there are plenty that could work just as well.  
Take another look at that small image in your favorite stamp set, and see if you can create a fun repetitious rainbow design.
To start, I took a white cardstock panel, and sketched a light pencil line across it.  I then alternated my colors, making sure to clean my stamp very well before going to the next color.
After my stamping was complete, I trimmed it down, and adhered it to a black card base, stamped a simple sentiment, and added some black enamel dots.  Super simple, and easy to do!  I hope you give those small images in your stamp sets a fresh look and create something fabulous with them! Thanks so much for joining me today.


Pin It

Wednesday, June 4, 2014

DT Day: Vera

Hi everyone. Vera here. Sigh.... Can you  believe it's already June? Time sure fly, don't they? 

Anyway, this past weekend as I was looking at my pile of stuff, I realize that I have quite a bit of 6x6 paper pad that just sit there on the shelve. Yes, I love paper pad. Pretty papers make me happy. But, I do feel guilty when they just sit there. So, with that in mind I decided that I need to make a card using those papers and here's what I came up with.


I am patting myself on the back as I managed to use patterned paper from 4 different paper pads on this card. The background paper is from  Pink Paislee Pen Pals pad. The camera from Jillibean Sightseeing Stew pad, the Hello bingo card is from Simple Stories Say Cheese and the orange border is from Lawn Fawn Into The Woods petite paper pack. The super cute hamster (I love this guy) is from Paper Smooches Party Posse set.

Layering patterned paper is not  my strongest suit, but I am quite please with the way this card turn out. I sure d need to play with those papers more. :)

Thank you all for stopping by here and don't forget to check the store. New goodies are coming this week!

Make sure you check in on our Facebook page, too!  We share news, updates, inspiration, and the occasional giveaway!

Pin It

Thursday, May 15, 2014

DT Day: Sheri

Hello IHP fans!  It's Sheri here.  Can you believe that it's already the half way point for May?  Well you know what that means...the school year is coming to an end and for some of us we will be celebrating Graduations for the Class of 2014!!


For my Grad card I thought that I would try using my new Speech Bubble die from Lawn Fawn that I picked up in my last IHP haul.  Seems like these type of cards are everywhere you look so I couldn't resist!!

Paper: Let's Polka 6x6 pad (Lawn Fawn), Black CS, White CS, & Velum; Stamps: Bold Buzzwords (Paper Smooches); Ink: Tuxedo Black Memento & Fog (Avery Elle); Dies: Stitched Journaling Card (Lawn Fawn) & Speech Bubble Die (Lawn Fawn); Tools: A2 Woven Folders by Lifestyle Crafts & Scor-buddy; Other: Black Sequins, Hemptique Twine, ATG Tape, & Number stickers (Studio 112)

Thanks so much for stopping By!  Have a wonderful day!

Make sure you check in on our Facebook page, too!  We share news, updates, inspiration, and the occasional giveaway!

Pin It

Tuesday, April 15, 2014

DT Day: Sheri

Hello IHP fans!  It's Sheri here.  Today, I have a card featuring some pretty papers and a couple dies.  These are one of my favorite type of cards to create since they are so quick & easy to put together.


I used papers from the Flourish 6x6 pad from Authentique.  I then cut out a Tag Scallop die from Paper Smooches.  The sentiment is cut with the Scripty Hello die from Lawn Fawn.  I then used a pierced velum circle, pink baby clothes pin, Hemptique Twine Cord, and My Minds Eye Enamel Dots to embellish.

Thanks so much for stopping By!  Have a wonderful day!

Make sure you check in on our Facebook page, too!  We share news, updates, inspiration, and the occasional giveaway!

Pin It

Monday, April 7, 2014

DT Day: Tracy


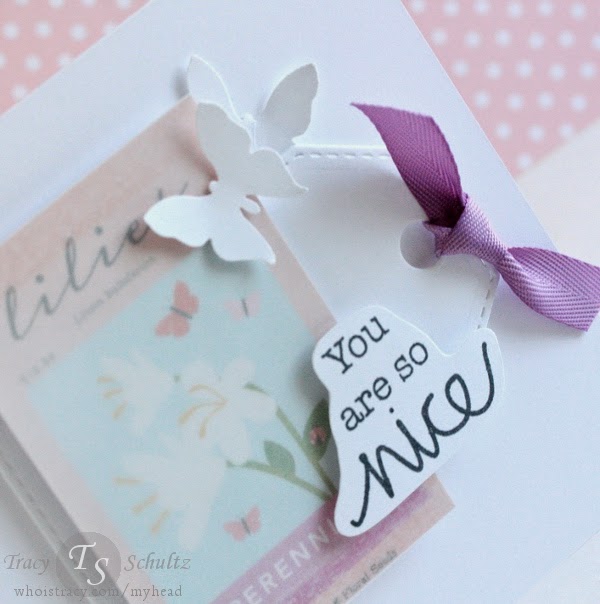
Hi there, it's Tracy invading the blog today to share a soft little card I made. I CASE'd one of my own cards from last month for this one. I reversed the layout, used some purple instead, and added a duet of butterflies.

I love these sentiments from Technique Tuesday- they're universal and so much fun!So Nice Recipe Cardstock: MFT sweet tooth; vellum Decorative Paper: Pebbles Garden Party Stamps: Technique Tuesday I Like You Ink: Memento Tuxedo Black Accessories: Paper Smooches Tag Stitched die, purple ribbon, Martha Stewart butterfly punch, Zva dimensionals

Make sure you check in on our Facebook page, too!  We share news, updates, inspiration, and the occasional giveaway!

Pin It

Tuesday, April 1, 2014

Guest DT: Jocelyn Olson

Today we're thrilled to be welcoming Jocelyn as our guest for the next two months.  Here's her first post for us!

Hi! It’s Jocelyn Olson from Red Balloon Cards. I’m thrilled to be the guest designer for the next couple of months!

I’m a wife, mom of two great kids, avid papercrafter, bright color lover, non-fiction book reader, Brady Bunch fan, and expert Polly Pockets dresser. In my spare time, I work as a consultant for states on Federal education and special education programs. Currently, I’m on the Glitz Design Digital and the Scraptastic Club Design Teams, and I’ve been fortunate enough to be published in Paper Crafts and Scrapbooking and CARDS magazines. I am primarily a card maker, although I love making all kinds of projects, both traditional and hybrid. You can see my projects on my blog at Red Balloon Cards. Thanks, i {heart} papers for having me as a guest!

Today, I’m sharing a card that’s pretty typical for me—stamps, papers, and embellishments. Fortunately for me, i {heart} papers carries all of those things. J


I started with the My Favorite Things Polaroids Dies—these are definitely a favorite. I die-cut them with BasicGrey Capture papers and did some fussy cutting from one of the papers to layer in the Polaroids. I also used Paper Smooches Cardbooking Dies to die-cut an arrow from one of the Capture papers and a heart from one of BasicGrey’s Spice Market papers. I love that these two 6x6s coordinate!

For the sentiment, I used Technique Tuesday’s Rah Rah Sentiments set. Here’s a close-up:


I added a few details to the card, like the Essentials Enamel Dots, the Hello Sunshine Mixed Sequins, and some stitching and misting.


Thank so much for stopping by!

Make sure you check in on our Facebook page, too!  We share news, updates, inspiration, and the occasional giveaway!

Pin It

Thursday, March 20, 2014

DT Day: Sarah

Hi everyone, Sarah here today to share a sweet little card that will have you wishing for sunshine!

I love challenges, and the Lawnscaping challenge this week (CAS cards) was the perfect excuse to whip out some new and older Lawn Fawn goodies!
  

Have you seen the new Large Stitched Journaling Card Die set? This was a must have for me! Here I've used the stitched journaling card die as my card base. This makes for such a cute sized card, perfect to tuck into a bouquet of flowers or a little gift bag. 

The paper on this card is Daydreamer by Dear Lizzy. I'm already noticing a lot of citrus influences this season! I stamped the outline lemon from Make Lemonade directly on the paper, doesn't it look cute? The jug was colored with copics, trimmed out and popped up. 

The speech bubble layer was created with the new Speech Bubble Border Die  and I've used the Scripty Hello to cut into it. The enamel dots finish off this simple design. 


Inside I used the same trick to highlight a lemon, and a small sentiment from Make Lemonade. I think this card would be a perfect pick-me-up for someone having a bad day!

Make sure you check in on our Facebook page, too!  We share news, updates, inspiration, and the occasional giveaway!

Pin It

Friday, March 7, 2014

DT Day: Tracy

It's Tracy's day on the blog today!  Here's her post!

My mom's birthday is this week, and I decided to use some fun, spring-like colors on her card. I couldn't resist the combination of papers from Pebbles and Basic Grey. I also used sketch #104 from Retro Sketches for the layout.


I added a tiny butterfly to coordinate with my paper and topped it off with a little twine. The sentiment is from Paper Smooches. I hope my mom likes her card this year!
Butterfly Birthday Recipe Cardstock: MFT sweet tooth Decorative Paper: Basic Grey RSVP; Pebbles Garden Party Stamps: Paper Smooches Sentimet Sampler Ink: Memento Tuxedo Black Accessories: Fiskars apron punch, CSS butterfly die-cut, Hemptique light pink twine, Zva dimensionals
Make sure you check in on our Facebook page, too!  We share news, updates, inspiration, and the occasional giveaway!

Pin It

Monday, February 24, 2014

DT Day: Lindsay

Hello i {heart} papers fans!  Lindsay here with you to share a fun little card I made using a few great products from the store.  Let's take a look, shall we?
I started with the fun new background set from Wplus9, called Borders and Backgrounds 3, stamping it repeatedly on my card base with Versamark Ink.  I then heat set it with white powder, and covered the card front with blue inks, in a gradient, to look like the sky. 
I then took the Paper Smooches set, Party Posse, and fussy cut my colored sheep.  Isn't he cute?!  I popped him up onto my card base, and added a strip of black cardstock, heat embossed in white with part of the sentiment.  As a last addition, I die cut "Happy" from the Paper Smooches die set, Birthday Words out of white cardstock and adhered it.  After rounding the corners, I added Glossy Accents to the eyes.
Thank you for joining me today!  Be sure to stop on over to the store to see all of the brand new goodies that are there!  Fun!


Make sure you check in on our Facebook page, too!  We share news, updates, inspiration, and the occasional giveaway!

Pin It